
Here is the thing nobody tells you when you buy a Squier Stratocaster: the factory setup is built for the middle of the road. It has to be. Fender ships thousands of these guitars a week to players in Phoenix and Glasgow and Osaka, and they set them up to survive the journey and offend nobody. That is not the same thing as setting one up for rock. If you plug your Classic Vibe '50s Strat straight out of the box into a driven amp, it will sound okay, maybe even pretty good. But it will not sound like it can. Not until you spend 45 minutes with a few basic tools making it yours.
I have been setting up guitars for 30 years. My own, my bandmates', guitars that came through the studio. The Squier Classic Vibe series responds really well to a proper setup because the bones are already good, solid alder body, decent tuners, the vintage-voiced pickups are genuinely usable. You are not fighting the guitar, you are just finishing what the factory started. Grab a Phillips screwdriver, a straightedge or ruler marked in millimeters, and a small Allen key set. You probably have all of this in a kitchen drawer.
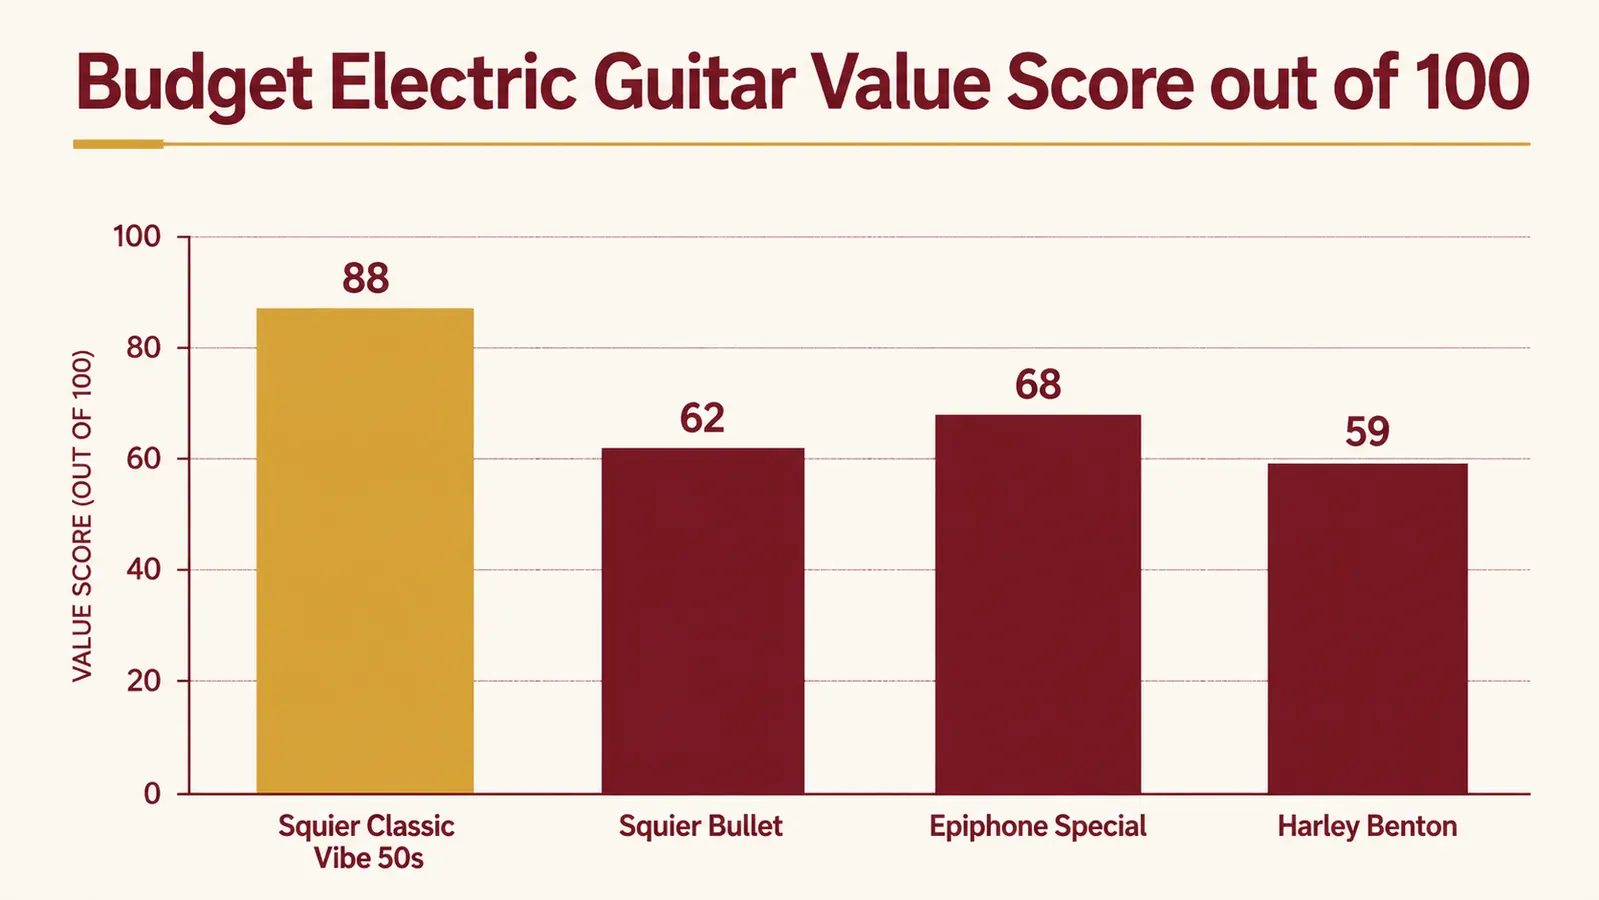
Before you grab the screwdriver, make sure you have the right guitar under your hands.
The Squier Classic Vibe '50s Stratocaster is the one I recommend for players who want real tone at a budget price. Solid alder body, vintage-voiced single-coils, and a neck that actually feels like something. Check today's price before you start this setup process.
Amazon Check Today's Price on Amazon →Step 1: Loosen the Strings and Check the Neck Relief
Before you touch pickup height or action, you need to know what the neck is doing. A back-bowed neck will fight every other adjustment you make. Fret the low E string at the 1st fret with your left hand, and the 12th fret with your right hand or a capo. Now look at the gap between the bottom of the string and the top of the 6th or 7th fret. You want a small gap, not flat, not a valley. Flat means no relief, which can cause buzzing all over the neck. A big gap means too much forward bow, which raises the action uncomfortably high in the middle of the neck.
For rock playing, a touch more relief than classical players want is actually useful. It lets the string vibrate more freely when you dig in hard. I like about 0.3mm to 0.4mm of relief at the 7th fret. If the neck needs adjusting, use a 1/8-inch Allen key at the truss rod nut inside the headstock, turning clockwise to straighten a forward bow (add relief by turning counterclockwise). Make small adjustments, a quarter turn at a time, and let the neck settle for 15 minutes before checking again. Never force the truss rod. If it feels stuck, put the guitar down and take it to a tech.
Once the neck relief is where you want it, put fresh strings on before adjusting anything else. Setup measurements taken over dead strings are useless. New strings, or at least strings that are a week or two old and fully settled, are what you want. More on string choice in Step 4.
Step 2: Set the Action at the Nut and the Saddles
Action is the distance between the strings and the frets. Too high and the guitar is a workout. Too low and it buzzes on anything above bedroom volume. The Classic Vibe's nut is pre-cut at the factory, and in my experience Squier does a reasonable job here, but it is worth checking. Fret each string at the 3rd fret and look at the gap between the string and the 1st fret. You want daylight, but barely. If you have to push the string down at all, the nut slot is too high. Fixing a nut slot means filing it lower, which is easy to overdo. Unless you are comfortable with nut work, leave the nut alone and take the guitar to a luthier for a proper nut cut if it feels stiff in first position.
Saddle height is where most players spend their time. On the Strat bridge, each saddle has two small hex screws on the sides. Turn both equally to raise or lower each saddle. For rock playing, I like the action a little lower than the Fender factory spec, because you are bending strings constantly and you want them to move. My starting point for the Classic Vibe in a rock context: bass side (low E, A strings) at 1.8mm to 2.0mm measured at the 12th fret; treble side (B, high E strings) at 1.5mm to 1.6mm. Mid strings (D, G) split the difference. Check after every full turn of the screws by fretting at the 12th fret and measuring below the string.
Test by playing hard, not softly. If you strum the way you actually strum when you are playing along to a Zeppelin track at gig volume, you need to set up the guitar for that attack level. Soft playing rarely reveals buzzing. If you get buzzing at a specific fret, check for a high fret at that position, which is a different problem. If the buzzing is widespread across the neck, raise the saddles 0.1mm at a time until it clears.

Step 3: Set the Intonation
A guitar with good action but bad intonation will sound wrong the moment you move above the 5th fret. Intonation means the guitar plays in tune with itself across the entire neck. To check it, play the open string, then play the 12th fret harmonic, then fret the 12th fret note. The harmonic and the open string will always agree. It is the fretted 12th note that tells you the truth. If the fretted note is sharp compared to the harmonic, the string is too short, so move the saddle back, away from the nut, by turning the saddle adjustment screw at the back of the bridge. If the fretted note is flat, the string is too long, so move the saddle forward toward the nut.
Do this string by string, one at a time. Use a decent chromatic tuner, the clip-on variety works fine, but a strobe tuner or a phone app with strobe mode is more accurate if you have access to one. Retune after every saddle adjustment because moving the saddle changes string tension slightly. Check intonation with the guitar in playing position, not lying flat on a table. Body position affects neck angle slightly, and you want to set it the way you will actually play it. The Classic Vibe's steel saddles are easy to move and hold their position well, so intonation work on this guitar is genuinely satisfying.
Step 4: Choose the Right Strings for Rock
String choice has an enormous effect on both playability and tone, more than most beginners realize. The Classic Vibe ships with strings that are adequate but not necessarily what you want for rock. The standard 9-42 gauge that a lot of entry-level Strats come loaded with is light enough that it feels almost weightless under your fingers, which sounds like a good thing until you realize your bends are going sharp all over the place and your tone has no weight to it.
For rock, I almost always go 10-46. The D'Addario EXL110 has been my go-to for years across several guitars. The extra mass gives the single-coils something to push against, and the tone is noticeably fuller in the mids, which is exactly where a Strat can feel thin if you are running through a cranked amp. The 10-gauge low E has enough tension that heavy picking does not go sharp, and the high E is still flexible enough for the bends you need. If you are playing heavier rock territory, drop-D tuning or anything detuned, consider going up to 11-49, but 10-46 is the sweet spot for standard-tuned classic and hard rock on a Strat. Read my full take on the EXL110 here.
After you put new strings on, stretch them. Grab each string between the nut and the first saddle, pull it away from the body gently, retune, repeat until the tuner stops moving. Five minutes of stretching saves you 20 minutes of retuning during your first practice session.
Step 5: Set Pickup Height for Rock Tone
This is the step that most players skip, and it is the one that makes the biggest difference in how the guitar sounds. Pickup height controls output level, but it also affects tone and string pull. Too close to the strings and the magnetic field of the pickup actually interferes with the string vibration, causing weird wolf tones and slight intonation problems that shift as you play. Too far away and you lose output and the pickups sound thin and glassy, which on a Strat can mean disappearing into the mix completely.

For rock on the Classic Vibe, I set pickup height by fretting the highest fret on the highest and lowest strings of each pickup and measuring from the bottom of the string to the top of the pole piece. Here are the measurements I use as a starting point: bridge pickup, bass side 2.0mm, treble side 1.5mm; middle pickup, bass side 2.5mm, treble side 2.0mm; neck pickup, bass side 3.0mm, treble side 2.5mm. These are not the Fender factory specs, which are a bit more conservative. I push the bridge pickup a little closer because that is where you want attack and presence for rock leads and crunch chords.
Adjust using the Phillips screws on each side of the pickup. Turn clockwise to raise the pickup, counterclockwise to lower it. Make small changes and play after each adjustment. You will hear the difference immediately. The bridge pickup on a Strat can be pushed fairly hard before you hit magnetic pull issues, but if you notice your high E sustaining oddly or your tuning getting weird specifically on the bridge pickup, back it off a millimeter. The middle pickup is tricky because it has to blend in the 2 and 4 positions on the selector, so do not push it as far as the bridge.
Step 6: Use the Pickup Selector Strategically
Most people know about positions 1 through 5 on a Strat selector, but not everyone thinks about using them intentionally for different parts of a song. For rock rhythm playing with a driven amp, position 4 (middle and neck pickups combined) gives you a warm, full sound that cuts without getting too bright or harsh. It also has a little natural hum cancellation because of the reverse-wound middle pickup on the Classic Vibe, which is useful if your amp has the gain up.
For leads, most rock players default to the neck pickup, position 5, for a smooth, warm singing tone that sustains well. The bridge pickup in position 1 is the sharp, cutting sound of classic Hendrix and early SRV, great for funkier rhythm parts or when you need to slice through a full band. The in-between positions 2 and 4 have that trademark Strat quack, which sounds incredible clean or with a light overdrive, less useful for heavy rock crunch. Knowing this in advance lets you position your pickup selector before the chorus hits, not scrambling for it mid-song.
One practical tip: once you have the pickup heights set, play each selector position at the amp volume you actually gig or practice at. The balance between positions changes with volume. What sounds level in your bedroom at low volume may have the bridge pickup screaming over the neck pickup at rehearsal volume. Adjust neck and middle pickup heights after you have done this test.
What Else Helps
A proper setup makes a good guitar great. But there are two other things that compound the results. First, the amp and the tone controls on it have as much effect on your rock sound as anything you do to the guitar. The Classic Vibe's single-coils are naturally bright, so if you are running into a solid-state amp with the treble cranked, no amount of pickup height adjustment is going to save you from a thin, harsh tone. Roll the treble back on the amp and push the mids up. Strats love midrange, they just need you to give it to them.
Second, the volume and tone knobs on the guitar are there for a reason. Rolling the guitar volume back to around 7 cleans up the sound in a way that feels almost like a different pickup, and rolling the tone knob back on the neck pickup when you are going for leads adds a smooth warmth that no EQ pedal can replicate the same way. Players who leave both knobs at 10 all the time are leaving a lot of tonal range on the table. If you are pairing this guitar with a modeling amp, read my Boss Katana 50 MkII review for how I dial in rock tones at both bedroom and rehearsal volumes.
The factory setup is built to survive shipping, not to make you sound good. Forty-five minutes with a Phillips screwdriver and a ruler, and you have a completely different guitar.
Last thing worth mentioning: once you have done a setup properly, write down all your measurements. Pickup heights, saddle heights, the approximate neck relief you ended up with. Keep it in your phone or taped inside the case. Strings age and stretch, humidity changes string tension and neck relief, and after six months you will be glad you have a baseline to work back to instead of starting from scratch. A well-maintained setup means the guitar feels the same in January as it did in July, and that consistency is what lets you focus on playing instead of fighting the instrument.

The Right Guitar Makes the Setup Worth Doing
All of this work pays off much more on a guitar that already has good fundamentals than on a guitar with a warped neck or cheap electronics that buzz no matter what. The Squier Classic Vibe '50s Stratocaster is genuinely one of the best platforms for this kind of setup work because the body is solid alder with real resonance, the pickups are vintage-voiced enough to respond to height changes in a musically useful way, and the hardware is stable enough that your saddle and intonation settings actually hold over time. Read my long-term review of the Classic Vibe to understand why I keep recommending it over every other guitar in this price range.
You do not need a $1500 American Professional to sound good playing rock. You need a guitar with solid construction, decent pickups, and a setup that matches how you actually play. The Classic Vibe gives you the first two. This guide gives you the third.
If you are going to do this setup right, start with a guitar that is worth setting up.
The Squier Classic Vibe '50s Stratocaster has the alder body, the vintage-voiced single-coils, and the stable hardware that make a real setup matter. It is the guitar I would recommend to any serious rock player who does not want to spend American Fender money. Check today's price on Amazon and see if it is available in the color you want.
Amazon Check Today's Price on Amazon →