
Here is something most guitar YouTube channels skip: putting fresh strings on wrong is worse than leaving the old ones on. I have watched players stretch strings improperly, skip the fretboard clean, wrap their tuning pegs like a spool of wire, and then spend three songs at the gig tweaking between every break wondering why nothing holds pitch. I have been playing for 30 years. I have restrung hundreds of guitars, including ones in studio sessions where the clock was running at $75 an hour. The method I use now has not changed in about 15 of those years, and it reliably gets a guitar holding tune within 20 minutes of the last string going on.
The D'Addario EXL110 is the string I have on almost every electric I own right now. Regular Light gauge, 10-46, nickel wound. It is not glamorous. It is not boutique. It costs about seven dollars a set when you buy the 3-pack, and it is the string that the majority of working rock guitarists land on eventually because it works. This guide will walk you through the full restringing process using those strings as the example, but the technique applies to any standard electric guitar string.
Stop restringing with whatever strings you grabbed last. Grab the pack most working guitarists end up with.
D'Addario EXL110 Regular Light 10-46 strings, sold in a 3-pack so you have backups at the gig. Over 20,000 five-star reviews. Check today's price and you'll understand why every studio has a box of these in the drawer.
Amazon Check Today's Price on Amazon →Step 1: Gather the Right Tools Before You Touch the Guitar
Do not start without having everything in front of you. The tools you need are not exotic: a string winder, a pair of wire cutters (side cutters, not the scissors from the kitchen junk drawer), a fretboard cleaning cloth, and your strings. If you have a lemon oil or fretboard conditioner, grab that too. A tuner, either clip-on or pedal, goes on the bench as well.
The string winder is the one tool people try to skip, and it is a mistake. Winding by hand is slow, tiring on your fingers, and puts inconsistent tension on the peg. A basic Planet Waves winder costs three dollars and saves you ten minutes per string change. If your guitar has locking tuners, you can skip the winder entirely since locking tuners only need one or two winds at most. Speaking of which: know what kind of tuning machines you have before you read any further, because the winding technique is completely different between standard tuners and locking tuners.
Get everything laid out before the first string comes off. Once you start, you want to move through the process without stopping to hunt for clippers.

Step 2: Remove Old Strings One at a Time, Not All at Once
I know you have seen people strip all six strings off in one go. Some tech guys do it because they are cleaning the whole guitar on a flat workbench and they have a neck support. For most guitars, particularly anything with a floating tremolo bridge or a vintage-style Strat bridge, pulling all six strings off simultaneously releases the spring tension and can shift the bridge angle before you have put anything back on. On a tune-o-matic or hardtail guitar, it matters less. But the habit of going one at a time is worth building regardless, because it keeps the neck under consistent tension throughout the job.
Use the string winder to loosen each string until it is slack, then unwind it from the tuning peg by hand and pull it free from the bridge or tremolo block. On Strats with vintage string-through bridges, you push the string backward through the body. On tune-o-matics, it just lifts off the bridge and slides out of the tailpiece. Clip the old string in half with your wire cutters before you throw it away so it does not uncoil and scratch the guitar body on the way to the trash.
Step 3: Clean the Fretboard While You Have the Chance
This is the one moment where you have unobstructed access to the fretboard, and every experienced player I know uses it. Wipe each fret slot with a dry cloth first to pick up the loose gunk. Then, if the board is rosewood or ebony (unfinished wood), put a small amount of fretboard conditioner on the cloth and work it into the wood between the frets. Do not use lemon oil on maple fretboards with a gloss finish. A dry cloth is enough for maple.
Check the frets while you are in there. Run your fingernail across each fret horizontally. If any fret has a rough edge, a buzz at that position is not a string problem, it is a fret problem. Good to know before you blame the new strings. Wipe the body down with the same cloth and let everything dry for two minutes before stringing up.
The moment you have all six strings off is the only time the fretboard is fully exposed. Use it. Two minutes with a cloth and some conditioner is the difference between a guitar that feels like a tool and one that feels like an instrument.

Step 4: Install the New String and Wind It Properly
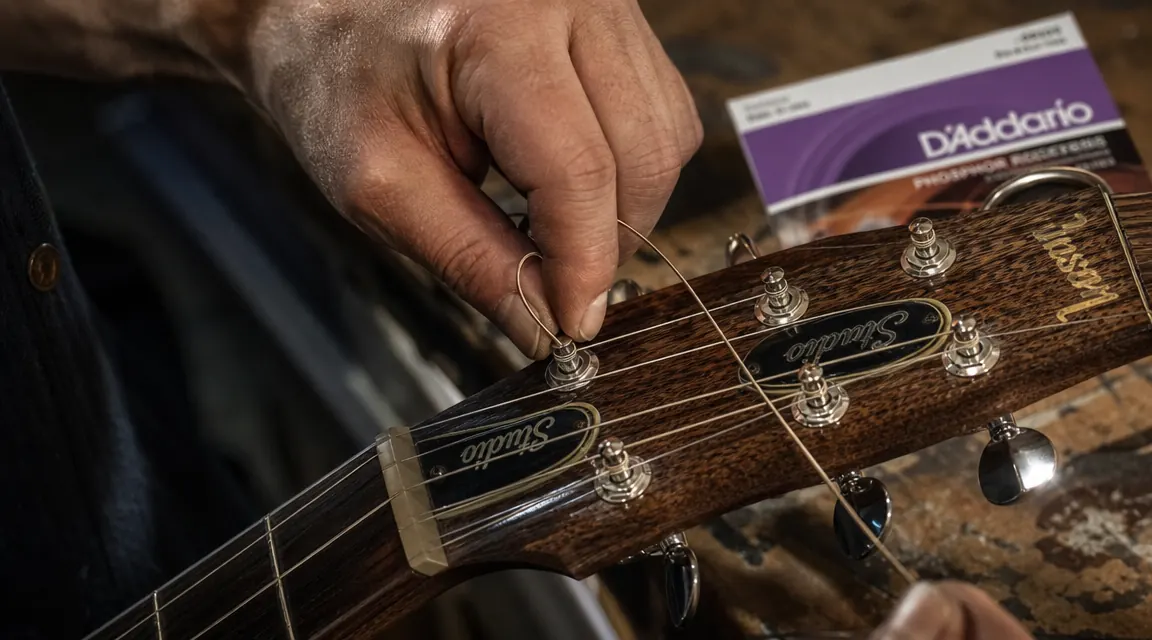
Thread the string through the bridge first, whether that is the tailpiece, the tremolo block, or the through-body ferrules. Pull it all the way through until the ball end seats against the bridge saddle or the ferrule on the back. Now bring the string up to the tuning peg and cut it to the right length before you start winding. This is where most beginners over-tighten or run out of peg space.
For standard tuners (no locking mechanism), the traditional rule is to leave enough slack for three winds on the peg. A practical way to measure: after threading the string through the peg hole, pull the string taut, then push it back toward the bridge about two to three inches. That slack becomes your winding material. Feed the string through the peg hole, kink the end slightly to hold it in place, then wind downward toward the headstock. Each wrap should sit below the previous one, working toward the bottom of the peg. Three winds on wound strings (low E, A, D, G on most sets), two to three on the plain strings (B and high E). Keep the winds clean and tight with no crossing.
If you have locking tuners, the whole equation changes. Thread the string through the peg, pull it taut with zero slack, clamp it down with the locking mechanism (usually a thumb wheel on the back of the headstock), and then wind once or twice just to get the string seated. That is it. More winds with locking tuners are counterproductive, they just add mass to the peg with no tuning benefit. The lock is what holds pitch, not the wind count.
Step 5: Stretch the Strings In Properly
Fresh strings are elastic, and until that elasticity is broken in, they will go flat. This is the part most people rush, and it is why their guitar is still drifting out of tune after a full day of playing. You need to stretch each string manually before you trust it.
Bring all six strings up to rough pitch first. Then, starting at the low E, grab the string between the first and fifth fret and pull it straight up, away from the fretboard, with two or three fingers spread across the length. Use moderate force, not enough to snap it but enough that it pulls noticeably sharp. Let go. Re-tune. Pull again. Do this three to five times per string, moving across the fretboard in sections: first to fifth, fifth to twelfth, twelfth to body. Then move to the A string and repeat. Go through all six strings, bring them back to pitch as a set, then run through the stretch cycle a second time. After two full passes, your strings should hold within a few cents of pitch even after aggressive bends.
If you are in a hurry at a gig, use the quick version: bring to pitch, grab each string and pull it sharply at the twelfth fret three times, re-tune, do one more pass. It gets you about 70 percent of the way there and is usually enough to get through a set without issues.
Step 6: Check Intonation After Every Restring
Fresh strings sometimes shift intonation slightly, especially if you changed gauges or brands. Once your strings are stretched and holding pitch, plug in and check each string's intonation with a chromatic tuner. The process is simple: play the open string, check the pitch. Then fret it at the 12th fret (which should produce the same note one octave higher) and check again. If the fretted 12th is sharp compared to the open string, the saddle needs to move away from the nut (back toward the bridge). If it is flat, the saddle moves toward the nut.
On most electric guitars, saddle adjustment is done with a small Phillips or flathead screwdriver. Turn the saddle adjustment screw clockwise to move it back (toward the strap pin), counterclockwise to move it forward. Make small adjustments, a quarter turn at a time, re-tune after each one, and recheck. You are looking for the 12th-fret harmonic and the 12th-fret fretted note to match within one or two cents. Getting this right means chords sound in tune all the way up the neck, not just in open position.
For the D'Addario EXL110s specifically, if you have been using the same gauge you likely will not need significant saddle adjustments. The intonation check is still worth doing every time because fret wear, humidity changes, and neck relief all affect where the saddle needs to sit. Think of it as a 10-minute quality check, not a full setup job.
Why D'Addario EXL110 Is the String Worth Learning This Process With
A lot of players waste months fussing with boutique strings, coated strings, pure nickel strings, and flat wounds before they admit that the EXL110 is what they actually want on a rock guitar. The 10-46 gauge is the right balance point for standard tuning on most electric guitars: light enough to bend without cramping your hand after an hour of playing, heavy enough to give the low strings some body and not feel like fishing line. Nickel wound over a hex core gives you good magnetic response to your pickups and a bright but not harsh top end that sits right in a mix.
The 3-pack format that comes with the EXL110-3D is worth buying every time over single sets. You save money per set, and more importantly, you always have a fresh set in the case ready for a string break at the gig. At nearly 21,000 Amazon reviews averaging 4.8 stars, these strings have as close to a consensus as the guitar string world ever produces.
They also respond well to the stretching and winding technique in this guide. Cheaper strings from no-name brands tend to have less consistent core-to-wrap tolerances, which means they can be harder to intonate correctly and lose tone faster. The EXL110 has a quality control standard that makes your restringing work pay off.
What Else Helps
Once you have a solid restringing process, a few supporting habits will extend the life of your strings noticeably. Wash your hands before every playing session. Sweat and skin oil are the primary cause of string corrosion, and playing with clean hands can double string life easily. After playing, wipe down the strings with a dry cloth, running the cloth under each string to get the underside too. That is where the oils accumulate. If you are recording or playing a high-stakes gig, put on fresh strings two days before and run them through a full stretch-in over those two days. They will be fully settled and responsive by showtime. A day-of restring is always a gamble.
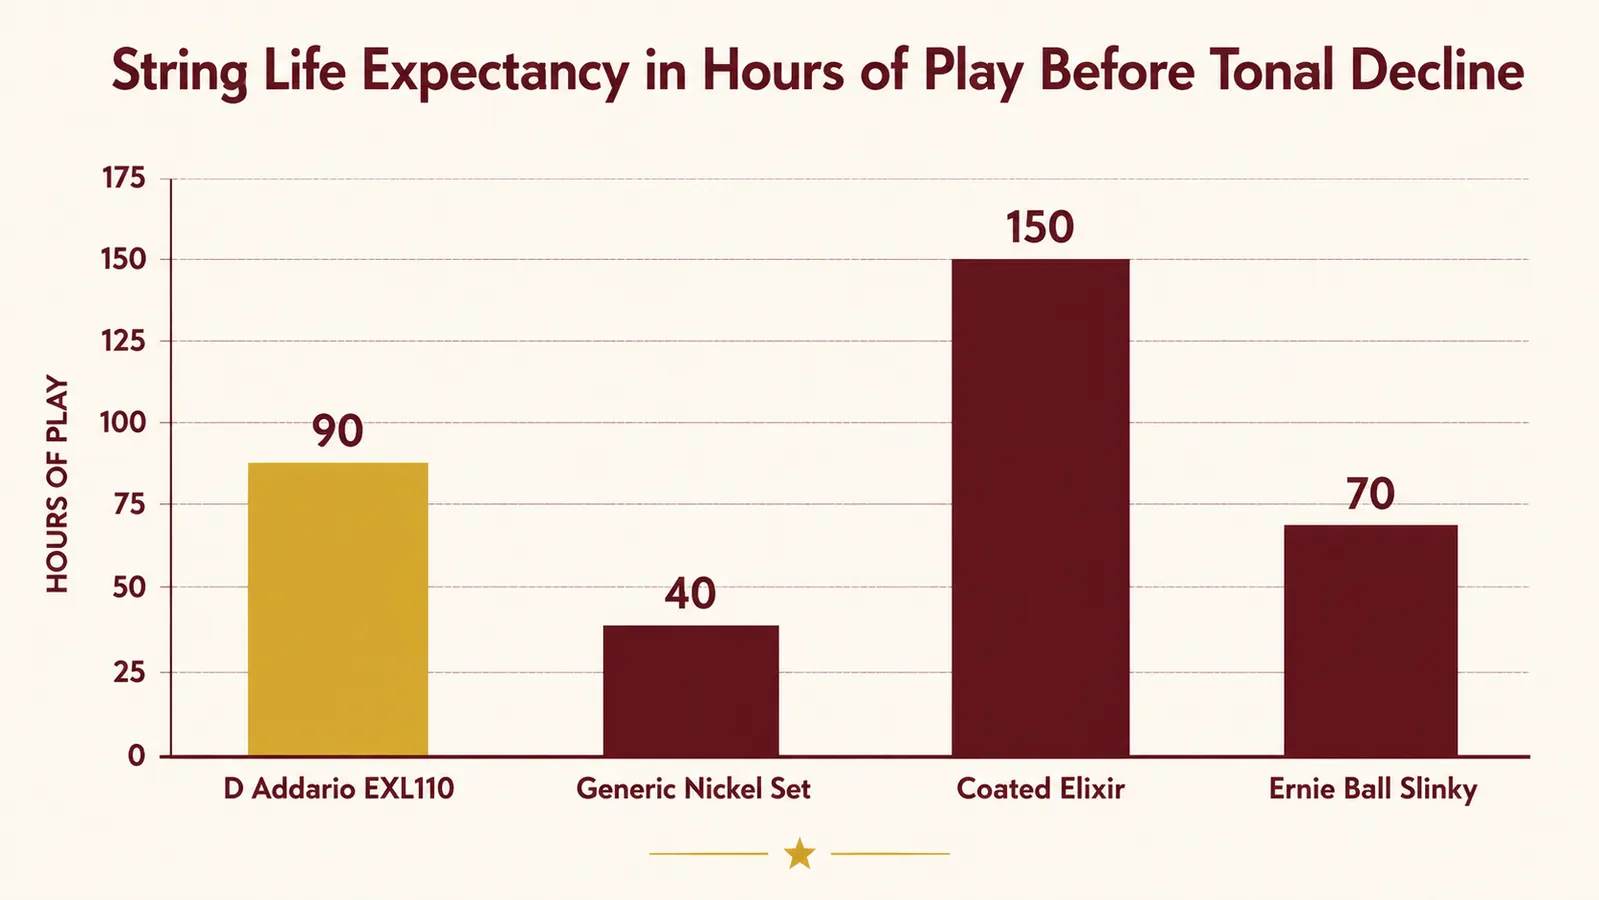
If you want more detail on which D'Addario string works best for each playing style or guitar type, the full long-term review covers string life, tone evolution over weeks of play, and how the EXL110 compares to the alternatives. And if you are setting up the guitar beyond just a restring, the Squier Stratocaster setup guide walks through action, pickup height, and truss rod basics using the same hands-on approach as this article.
If you just learned the right way to restring, make sure what you are putting on is worth the effort.
D'Addario EXL110-3D Regular Light 10-46, the string that ends the brand-hopping for most rock guitarists. Three sets, nitrogen-sealed for freshness, ships from Amazon. Check today's price.
Amazon Check Today's Price on Amazon →